

Here's the moment. Your son emerges from the surf holding a football-size conch shell. His look-what-I-found grin and the lustrous pink interior of the mollusk's home inspire you to reach for your camera, which for most of us these days is our smartphone. You rapidly snap a half-dozen shots and toss the phone back in your beach bag. Later, maybe back at the hotel, you examine the results.
They're not what you hoped for.
The boy's eyes are closed or squinting in half the images. In the background, strangers play in the surf, like some unwanted photobomb. The colorful shell that glittered so perfectly when you took the shot is a dark mass. Yes, you recorded the moment, but now you're thinking twice about posting the images to Instagram and showing them to anyone.
Great photos typically don't just happen, although you can luck into a few. But we can learn to shoot like a pro using just an iPhone and a few handy apps, says Karen Messick, a photographer and instructor whose images have appeared in numerous galleries and publications. In 2009, Messick helped create the iPhone Photography course for Odyssey, the noncredit personal enrichment program hosted by the Krieger School of Arts and Sciences' Advanced Academic Programs.
The course, which was offered again this fall, is designed to advance the skills of both the casual and the experienced photographer, who can learn to transform images into art, and capture memories and experiences worth framing, or at least posting to social media.
"Smartphone photography can be an amazing part of everyday life," Messick says. "I wanted to offer the opportunity for people to learn the full capability of this art form. There's so much more than point and hit the shutter button. I want to teach people how to make better images."
As Messick prepared to move to Hawaii and hand over the course to Karen Klinedinst, a Baltimore-based landscape photographer and graphic designer, we spoke with her to glean some tips to immediately improve your iPhone camera prowess.
Slow down
Photography is a discipline, Messick says, so take your time—even with a candid shot. "Treat your iPhone like a [DSLR or 35mm] camera. Use the same thought process," she says. In other words, people often just switch on their camera app and then point and shoot without considering any environmental factors, camera functions, or positioning.
Establish focus
"Get in touch with what you love about what you just saw. What made you stop and take your camera out in the first place? Work hard and drill down to include only that subject," she says. People tend to include "too much stuff" in the frame, she says. Zoom in or just walk in, she says, cropping out what you don't want, like those kids behind yours splashing in the water, or that ugly rock beside the beautiful yellow flower that captured your eye. "What you don't love or don't want in the frame is taking away from the photo's impact, and you're shortchanging the subject."
Choose an exposure
Most people don't consider exposure, she says, and their photos turn out too dark (underexposed) or too bright (overexposed). The natural light is not always ideal, so you have to adjust. Tap anywhere on the live preview in order to bring up the focus point. Next, tap and hold on the exposure button (it looks like the sun). The slider that appears allows you to adjust the exposure. When you're happy with the amount of light hitting your subject, stop and shoot.
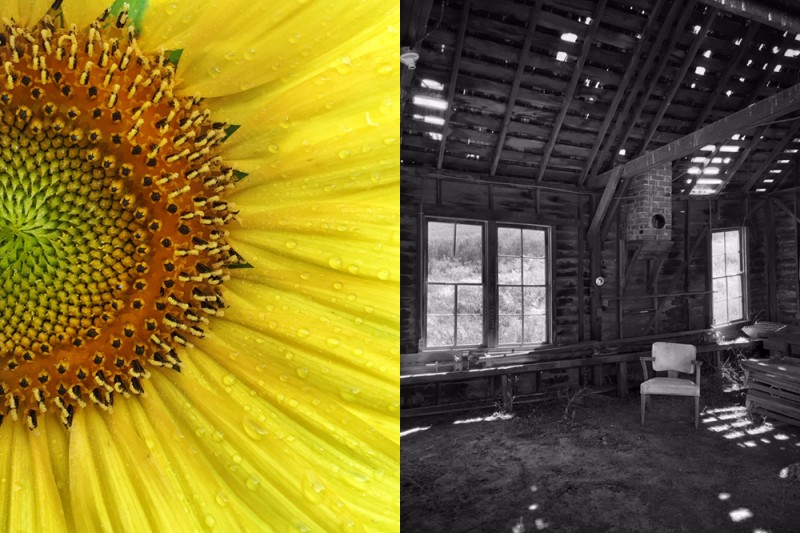
Image caption: Left: Close-up of a sunflower in McKee-Beshers Wildlife Management Area in Poolesville, Maryland. Captured with Camera+ in macro mode and processed in Snapseed. Right: An abandoned shed in Palouse Falls State Park in Washington state. Captured with Vivid HDR and processed in Snapseed for monochrome conversion.
Image credit: KAREN MESSICK
"Also ask yourself what you want exposed correctly. What should be bright and what should be dark. Some objects can be dark, like a silhouette on the shoreline, or the horizon of a beautiful red sky." She also recommends turning the flash function off (the lightning bolt symbol on the top of the screen), leaving on the HDR (high dynamic range) option to better balance shadows and for better contrast, and purchasing apps such as Camera+ or vivid HDR, which have more sophisticated exposure functions. "These apps can help you achieve another level of detail in your photos. It's like magic."
Know your position
Ask yourself, what direction is the light coming from, and how is the natural or artificial light hitting your subject? Are people's faces in the sun or shade? Have them adjust position accordingly, or move until the light and shadows are where you want them to be. If the sun is behind your subject, you can achieve a nice flare or backlit effect. Keeping the sun behind you can work well for landscape shots but is worse for portraits, when the subject might be squinting. "The worst time to shoot is middle of the day," she says. A high, midday sun can create unflattering shadows on your subject, or cast too much brightness. The best time of day for outdoor photography, she says, is just after sunrise and just before sunset, the so-called golden hours.
Compose the shot
"I often tell people to zoom in with their feet. Just walk in and use the grid lines to determine what should be in the frame, and where your subjects should be." When taking a landscape photo, some choose to put the horizon dead center in the image. "No. No. No," she says. "Don't crop out the beautiful sky. Maybe the sky should be two-thirds of your horizontal frame, and the other one-third the land."
She also laments "bull's-eye images," where the subject is dead center and static. She recommends more dynamic movement with your images, which can be achieved by shooting up or down on an object, or using the rule of thirds, which means placing the main focal point a bit off to one side. The viewer is drawn into the entire composition, instead of just glancing at the center.
Have fun with effects
The iPhone camera comes with several built-in photo filters such as "noir," "mono," and "chrome" to render a more artistic treatment of your photo. Use them. Again, Messick recommends downloading some apps that can help you touch up or put such effects on photos, such as Snapseed (for Android or iOS), a photo editing tool that can turn your photo black and white, grainy as if it was taken in the 1960s, or Glaze that make it look like an oil-on-canvas painting.
Posted in Tools+Tech